How to backup Windows Live Writer
Windows Live Writer is a blog writing tool. It provides a powerful editing environment, like a simple MS Word. You can use it to write on your own computer and after finishing a post just click the publish button. The post will be published.
If you are a blogger, you may know this software. It is a powerful utility for writing blogs. It supports many popular blogs API, such as WordPress, Blogger.com, etc. Windows Live Writer supports plugins. You can download some plugins to extend its functions. For example, highlighting your program code with Syntax Highlighting plugin. As a blogger, the articles are his life. To avoid your articles' losing, you should backup them regularly.
Backing up your Live Writer data with Windows Live Writer Backup
Step 1. First, download this utility and install it. Click to download
Step 2. Start it from the Program menu. The interface looks very simple.
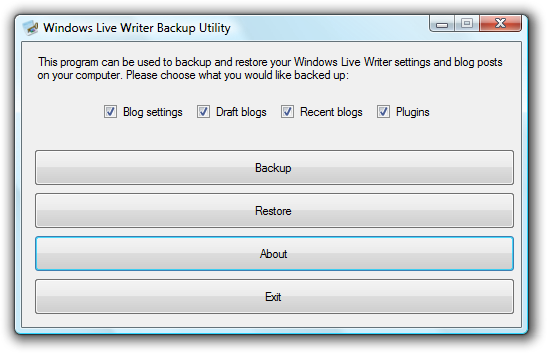
Windows Live Writer Backup Utility
Step 3. Choose what you want to backup. Here, "Blog settings" means your blog information, such as your blog name, address, account name and password, etc. Draft blogs are your posts that haven't been published. After you make your choice, click "Backup" button and choose a backup file name. A .wlwbackup file will be generated.
Restoring Windows Live Writer
Just click the "Restore" button in the picture above. An "open file" dialog will popup to let you choose the backup file. Note that restoring will overwrite your current blog settings. Your unpublished posts that haven't been backup up will be lost. To avoid the unfortunate thing, a warning dialog will popup. So please think it over before clicking "OK".
You can find more information about Windows Live Writer here: http://deepbluespaces.blogspot.com/2008/05/blogging-tool-windows-live-writer.html