How to backup your iTunes Library onto an external hard drive?
It’s obvious that keeping iTunes library backups is mandatory to avoid data loss in case of a computer crash. But, doing backups with iTunes means that you have to stay beside the computer for many hours to change the Backup-DVDs about every 20 minutes.
And, if you have a huge iTunes library, let’s say about 80GB, with plenty of purchases, songs, videos, ringtones, apps, books, playlists, tags, artworks... you will end up with a pile of 20 DVDs to say the least. Therefore, many people are looking for an easy way to back up the entire iTunes Library on an external hard drive. That’s why the CopyTrans team developed CopyTrans TuneSwift, allowing you to back up the entire iTunes library with some simple clicks.
TuneSwift basically allows you to back up, transfer or restore the iTunes library. You can transfer iTunes to an external/internal drive or to a new computer (PC & Mac) and you can make full and incremental backups on external hard or flash drives.
How to back up the iTunes Library using CopyTrans TuneSwift?
Download & Installation
Download CopyTrans TuneSwift from: www.copytrans.net/copytranstuneswift.php
To install the application on your computer just follow the on screen instructions.
iTunes Library Backup
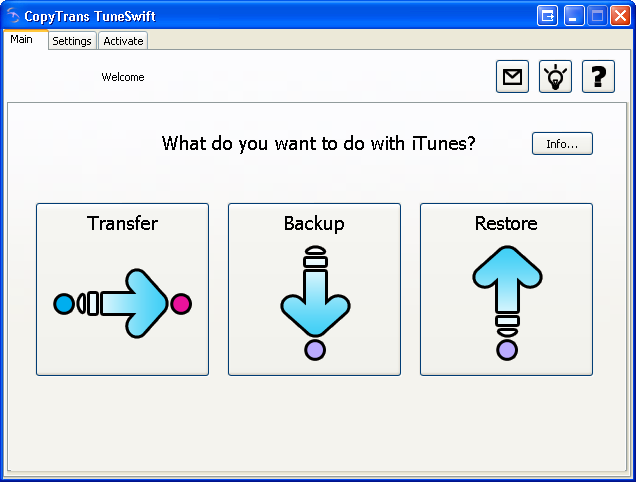
Once you launch TuneSwift, you’ll find a very simplified interface with three main buttons called ‘Transfer’, ‘Backup’ and ‘Restore’. To make a backup of the iTunes library on an external hard drive chose ‘Backup’.
CopyTrans TuneSwift - backing up iTunes Library
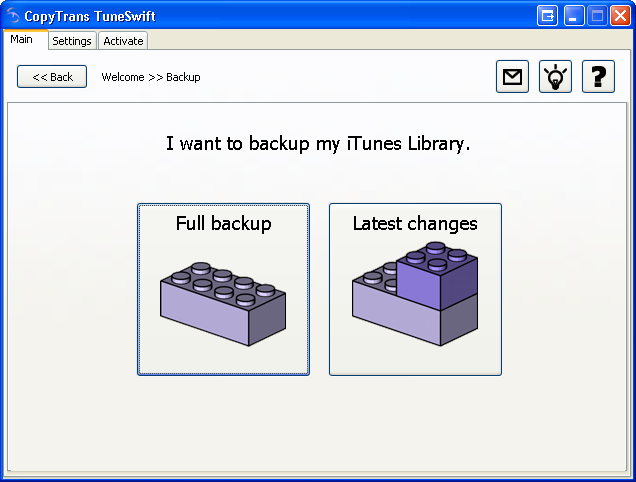
Now, a second window will open and you’ve got the choice between ‘Full Backup’ and ‘Latest changes’. If it is the first time you make a backup using TuneSwift, go for ‘Full backup’.
CopyTrans TuneSwift - backing up iTunes Library
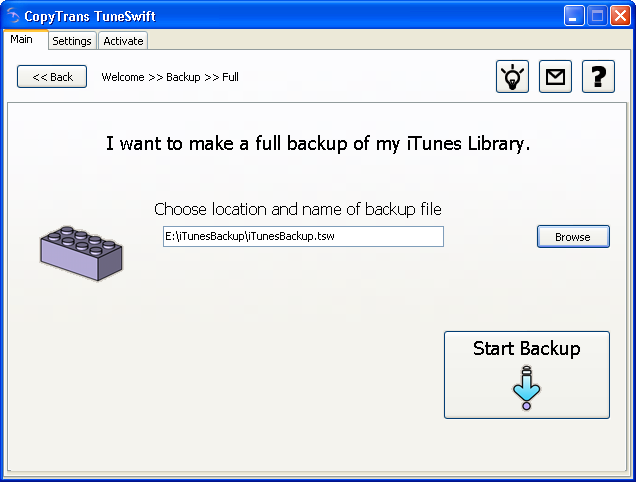
In the third and last window you have to select the external hard drive or USB flash drive, where you wish to save the iTunes backup files. Confirm your choice and click ‘Start Backup’.
CopyTrans TuneSwift - backing up iTunes Library
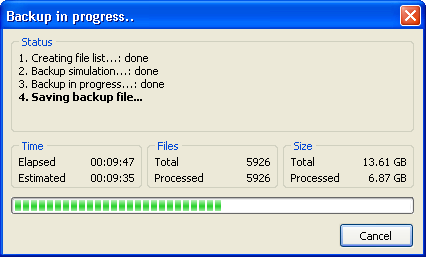
TuneSwift now starts backing up your iTunes library and you can monitor every step in a ‘Backup in progress’ window or enjoy a cup of coffee J.
CopyTrans TuneSwift - backing up iTunes Library
Once TuneSwift finish backing up your iTunes library it will notify you. That’s it! The entire iTunes library has been saved on the external drive.
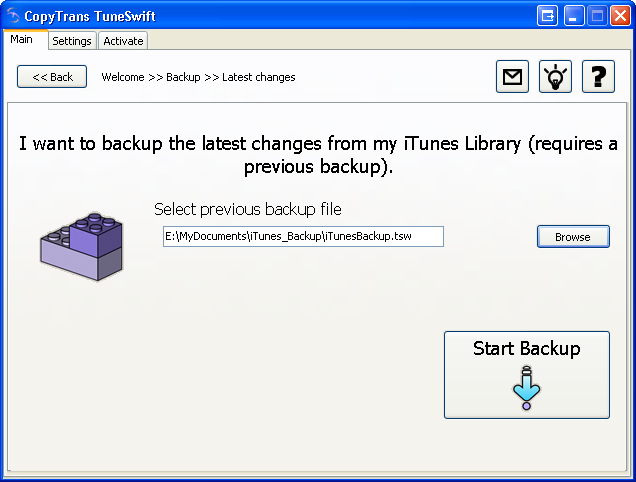
If you want to keep your iTunes backup file up to date, you can use the incremental backup. This will save only the latest changes from your iTunes library to the backup archive. To make an incremental backup, open TuneSwift, choose ‘Backup’ and click on ‘Latest changes’.
CopyTrans TuneSwift - backing up iTunes Library
Now you have to select the latest backup file (full or incremental) always ending with *.tsw. Confirm your choice and click once again on ‘Start Backup’. TuneSwift will now validate the already existing backup files and save the latest changes. Incremental backups look like this *.inc001.tsw.
That’s all. The application is really easy to use and allows you, in case of data loss, to restore your complete iTunes library from the backup file. You’ll find all your iTunes purchases, songs, videos, apps, books, audio books, ringtones, podcasts, playlists, artworks and tags like ratings, play counts etc. back again in iTunes, without having to bother with DVDs, or lost files etc.