How to backup Windows XP Home Edition
Your data is the valuable asset on your hard disk. To preserve this valuable asset it is essential to create a backup of your data. If you want to back up data using Windows XP Home Edition then you have to install it manually using your Windows XP CD-ROM, since Windows XP Home Edition does not include backup utility, ntbackup.exe. In case of Windows XP Professional edition this is installed by default to your system.
Steps 1: Decide Storage Devices and Installation
The initial step is to decide a backup device. Generally user can choose a USB drive or a CD/DVD drive or any other removable storage devices. However users have to install the drivers of the removable storage device in order to start the restore procedure. The best option is to install another hard drive on your system. Configure your second hard drive as ‘slave' and format it, prior to creating a backup into it.
Steps 2: Setup Backup Utility Programs
Open your Windows Explorer and Browse your CD-ROM, then locate the following folder: Valuead/Msft/Ntbackup and double click on Ntbackup.msi to install the Backup utility.
OR Open control panel >> Add or Remove Programs >> Add New Programs now select ‘CD or Floppy' key. The installation Program Dialog will open. Now locate the following folder VALUEAD/MSFT/NTBACKUP on the CD-ROM and double click on Ntbackup.msi to install the Backup utility.
Step 3: Get Started With Backup
Select Start >> All Programs >> Accessories >> System Tools >> Backup to open the Backup Utility. ‘Backup or Restore Wizard' will flash instantly as shown in Image 1.
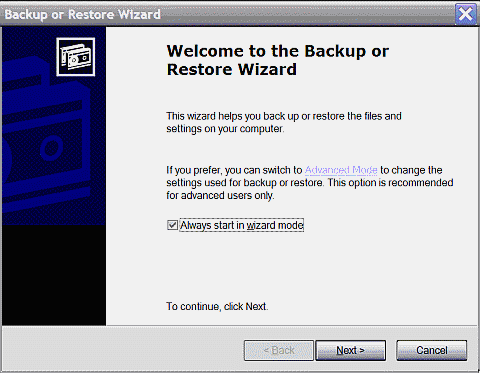
Image 1: Backup or Restore Wizard
Windows XP Home Edition Users have to choose their option carefully. Once you click on next tab you can't go to your previous dialog box as it does not support Automatic System Recovery (ASR) and the operation returns an error. Hence the users have to make sure on their inputs before clicking next tab in the entire process of Backup.
Now locate the items you want to Backup in your Backup or Restore wizard (refer Image 2).
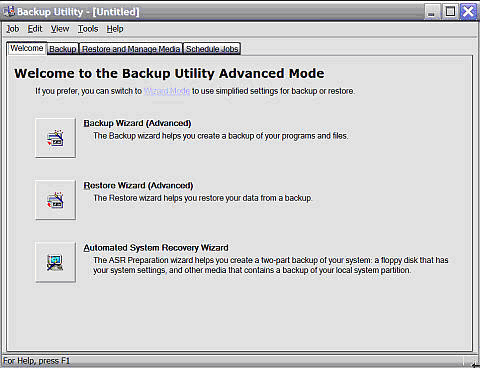
Image 2: ‘What to Back up' options.
Now select ‘Advanced Mode' option to start with your backup process.

Image 3: Advanced Mode
In your ‘Backup Utility' dialog box, click on the ‘Backup' option. Now you will have to select the drive and system state checkboxes. Name the directory of your backup operation, now select Start Backup option.
Once your backup is completed, shut down your system and disconnect your external hard drive where you have stored your backup data. This hard disk will help you to restore your data.
How to Restore files?
Connect the external drive in which you have created your backup data. Select Start >> All Programs >> Accessories >> System Tools >> Backup. ‘Backup or Restore Wizard' will flash instantly as shown in Figure 1. Now restore Windows XP from the backup file that you had created at the time of your backup process.
Windows XP Home Edition does not support Automated System Recovery; hence you can't restore your data in case of system failure. In this case you need to install fresh copy of the Windows XP Home Edition from the CD-ROM.